Byrjaðu frá byrjun og afskræmdu myndina með "filter/distort/polar
coordinates" og veldu "polar to rectangular"
Choose your original picture and
distort it to extremes with "filter/ distort/ polar coordinates" and there
you choose "polar to rectangular"
 Snúðu henni svo á hvolf (image/ rotate canvas/
flip vertical)
Snúðu henni svo á hvolf (image/ rotate canvas/
flip vertical)
Then flip it vertically (image/ rotate canvas/
flip vertical)
 Þegar hér er komið við sögu er tilvalið
að ganga skrefið til fulls og umbreyta litum myndarinnar einnig.
Það er hægt með ýmsu móti en ein afar
áhrifamikil leið er að setja neon-slykju yfir myndina (filter/
artistic/ neon glow). Athugaðu að þar geturðu stillt
marga þætti neon-birtunnar - til dæmis litinn.
Að lokum ferðu í curves (adjust/ curves) og leikur þér
með línuritið (lætur línuna halla öfugt
til dæmis) allt eftir smekk.
Þegar hér er komið við sögu er tilvalið
að ganga skrefið til fulls og umbreyta litum myndarinnar einnig.
Það er hægt með ýmsu móti en ein afar
áhrifamikil leið er að setja neon-slykju yfir myndina (filter/
artistic/ neon glow). Athugaðu að þar geturðu stillt
marga þætti neon-birtunnar - til dæmis litinn.
Að lokum ferðu í curves (adjust/ curves) og leikur þér
með línuritið (lætur línuna halla öfugt
til dæmis) allt eftir smekk.
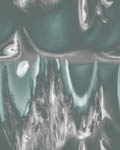
Now that we have already distorted the picture
quite a lot we might just as well do it properly and twist the colors as
dramatically. For a full psychodelic effect choose neon as your filter
(filter/ artistic/ neon glow). Notice that you can choose your own
neon color within the window that appears. Now choose curves (adjust/
curves) and turn the line upside-down and skew it to suit your taste.
 Núna loksins er hægt að leggja lokahönd á
verkið. Það gerum við með offset (filter/ other/
offset) eins og áður og nuddum síðan skilin milli
rammanna með "smudge"-áhaldinu. Þá ætti
myndin að vera tilbúin sem bakgrunnsmynd.
Núna loksins er hægt að leggja lokahönd á
verkið. Það gerum við með offset (filter/ other/
offset) eins og áður og nuddum síðan skilin milli
rammanna með "smudge"-áhaldinu. Þá ætti
myndin að vera tilbúin sem bakgrunnsmynd.
Putting the final touches you will only to "offset"
the picture (filter/ other/ offset) and "smudge" the line out between the
frames as before. Now it will be ready as a background picture.
 Hugsanlega mætti stilla birtustigið svo að
hægt sé að skrifa beint á bakgrunninn (dekkja allt
hvítt eða lýsa allt svart). Það gerum
við í "adjust/ levels" og rennum neðsta sleðanum til.
Árangurinn sést á næstu
síðu.
Hugsanlega mætti stilla birtustigið svo að
hægt sé að skrifa beint á bakgrunninn (dekkja allt
hvítt eða lýsa allt svart). Það gerum
við í "adjust/ levels" og rennum neðsta sleðanum til.
Árangurinn sést á næstu
síðu.
You might possibly want to make the brightest
points a bit darker or the darkes points a bit grayer. You can do
that in "adjust/ levels" and move the slide at the bottom of the window.
To see the result, click here.
|